Geode Tie Ice Dyeing
This story starts with the terrific suggestion of friend BG to try out some ice dyeing. For both of us it was the first time doing this dye technique. The pictures in this blog will all be of my project. She worked with rayon and I took linen curtains from the thrift store.
The very first step, and not shown here, was to launder my piece of fabric. Although the fabric may be new, you want to remove all sizing and any possible dirt. I washed it with Synthrapol soap in the machine.
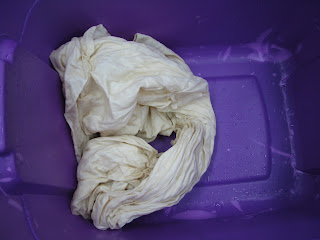
In the first photo is a shot of dye day #1. Into four gallons of cool, softened water I put four cups of wash soda. Stir around to dissolve. Add the clean cloth and push it down repeatedly so it is submerged in the liquid. I left mine for about 30 minutes. Occasionally I shifted the fabric around a bit.
Then I dumped out the mordant liquid, the wash soda in water. I wrung out the cloth as well as I could. My piece of cloth is a medium weight linen and measures 57" wide and 96" long.
I decided on the geode tie dye method to isolate portions of the cloth to maintain a bit of white. I figured I could space out about five geodes on this large cloth. I followed the recommendations I saw on other websites. For natural looking geode shapes, do not aim for circular patterns in the tying. You want irregular bands. So pinch off the cloth near the centre of a geode. Do not smooth the fabric down away from the pinch. That will make the shape too round. Instead, pull up a little hitch of fabric on at least one side. Start wrapping a cord around the gathered fabric. I used a polyester "artificial sinew" that is heavily laden with wax. Wrap and pull tight. It helps to have the cord wrapped around a stick or bobbin, so you can really pull tight. This sinew product will stick to itself and not come undone. No knots are needed. I wrapped about 3 to five times in every spot. I probably spaced the wrapped areas 2-3 inches apart. And I did about 4 sets of wraps per geode. I really did this part quickly and without over thinking. Just kind of powered through it. In the photo you can see four of the "geodes" tied up. There was a fifth.
Now the tied cloth is nestled into a cardboard box collar. I pretty much just dropped it in there and it turned out that the tied areas fell basically left to right. So I did not fiddle with anything. Just make sure that your fabric goes from wall to wall in this cardboard collar.
The box has no bottom and it sits on a metal grating. I had a piece of goat panel fencing. Then on top of that I placed some hardware cloth. the cable ties hold the two layers together. An ordinary plastic tote bin will catch the dye and water.

I had guessed that we would need ten pounds of ice per project. We used a bit less. Pile up the ice overtop of your fabric. We tried for an even layer of ice over the whole cloth.
And here are the powdered dyes I used on my project. From bottom left they are (clockwise): eggplant, khaki, avocado, chartreuse, and lavender. Okay, so many of these dye powders do not look anything like the label colour. I don't know whether that is because the dye is made of various components and those predominate. I have not used these old old dyes enough to know whether the dyes can break down and change colour (Texas heat?) . I don't think so. So I forged ahead assuming I would get what I thought , from the label name. I used fiber reactive dyes.
Here is a shot of the ice all covered with dye powder. You must wear a very good filter mask when handling the loose powder, until it is all wetted down. I had no idea how much powder to put on the ice. But with a thicker fabric, and being linen, which does not take the dye as well as silk or cotton, I opted to put a lot on there. Use a different plastic spoon for each jar of powder.
In terms of laying down the dye, I chose to start with a diagonal line of eggplant across the whole thing. Then I applied other colours in parallel bands, kind of going for symmetry. But once again I was not trying to be analytical or careful. No pre-planning.
Once the dye was on to my satisfaction, I sprinkled a bit of wash soda (dry powder form) over top of it all.
Now the hard part. Waiting. We waited about 24 hours.
Day #2 BG's cloth only had minor small clumps of undissolved dye. Primarily just in the darkest blue. With my set up, I had a fair amount of undissolved powder, after the 24 hours. Maybe 5-6 tbsp if I had to guess.
I am missing a photo here of the next critical step. I thought I took one, but alas, it did not store in the camera. Take your fabric to a sink or hose with cold water. I tilted my fabric over to drop the little bits of excess dye, down the drain. Then I started to rinse and rinse and rinse. Like 10 or 15 minutes of rinsing. You want to wash away all the soda ash (wash soda) before you untie any tied bits. Also you will see a lot of dye running down the drain. This is normal. I rinsed this for a very long time. Then I started to unwrap my sinew ties, rinsing those specific areas as I undid them. Keep moving and working the fabric non-stop. It was very easy to untie the sinew because you do not make knots in the sinew. It just sticks to itself and I left a long tail at the end of the tying. So just grab the tail and unwrap easily.
I would estimate it was five more minutes of rinsing after I untied it all.
I also do not have a photo of the next step. Wash machine. Wash your fabric in Synthrapol. We used hot water, warm rinse, as per Synthrapol directions. I used about two teaspoons of Synthrapol.. BG ran her rayon through the dryer. Because I have linen, I did not want it in the dryer. But after the spin cycle of the machine, it felt quite dry. Not dripping.
And here was my first look at what I had accomplished in this dye experiment. My friends held up the fabric for me. I was very happy to see this. At the beginning of the rinsing stage, it all looked so black or dark that I feared it was going to be dismal.
But look at the colours! I was going for earthy. I was going for irregularity in those geode shapes ( remember to hitch up the fabric as your tie). I call it a success.
A few random close up shots follow.
Some of the little shapes that allude to a square shape may be a result of the fabric sitting on hardware cloth.
Colours "broke". That means that for a dye colour that is not a pure primary colour, the constituent colours may separate. So this explains why I have so many colours in my final project.
In some places there are wonderful, fine details.
Here is the linen drying on the line. Five geodes. I will use this cloth in conjunction with a second that I am dyeing right now. I will sew up a jacket with it. One geode will be featured on the front. Another on one sleeve. One for the back. The second fabric is an accordion fold and tied fabric. I used the same colours minus the eggplant. I cannot wait to see how it comes out.


.jpg)


Comments
Post a Comment